Top 16 Questions about Advanced Email Verifier
1. I receive the result " Unknown" with the "10060: Connection Timed Out" error for 80% of my emails. Please instruct how to receive Good or Bad responses for the e-mail addresses in my list.
Do not use the direct Internet connection mode if you installed the Advanced Email Verifier on a local computer. This mode can be used only if you install the program on a Windows VPS or Windows server with proper PTR and FCrDNS records. Otherwise, your IP can be blacklisted or you can get a lot of connection refusals (“Unknown” results) because most SMTP servers refuse direct connections from personal/home computers.
Note that the Advanced Email Verifier works like a SMTP server and uses the port 25 to connect to the recipient’s mail server and verify the email address. That's why the Advanced Email Verifier needs access to the port 25.
The port 25 may be blocked either by your firewall, or anti-virus software on your computer or by your ISP. Make sure that you added the Advanced Email Verifier (aev.exe file) to the list of the applications that are allowed to access the Internet in your firewall settings. If you have an anti-virus scanner, make sure that you disabled the real time scanning of outgoing emails. Or, you can switch the anti-virus program at all while you are working with the Advanced Email Verifier.
If after making these changes you still receive the "10060: Connection Timed Out" error for the majority of email addresses, go to the AEV Settings, click on the Connection tab, select the "Direct Internet Connection" option and click "Test". If the test fails, it means that your ISP blocks the port 25.
In this case, you can:
- use the web script;
- use BPSocks Email Validation API;
- install the Advanced Email Verifier on a Windows VPS (virtual private server) with a clean IP address and proper Forward-Confirmed Reverse DNS and PTR records.
2. My ISP is blocking the port 25. I want to use a web script to verify my contact list. How do I upload the script to my site?
You can use your favorite FTP client to upload the aev7.php file to your site. We use the FlashFXP tool from http://www.flashfxp.com/. You can download FlashFXP and use it for 30-days for free. Follow the steps below to upload the script to your site:
1. Open FlashFXP
2. Press F4 key on the keywboard
3. Click "New Site" on the displayed window
4. Enter the new site details:
Site Name: enter your domain name
IP Address: enter your domain name again
Port: 21
Username: enter your username
Password: enter your password
5. Click "Connect"
6. Browse the folders and select the aev7.php file on the right pane of the FlashFXP.
7. Click the right mouse button on the aev7.php file and select "Transfer". Or, simply drag and drop it to the left pane.
The file will be uploaded to the ftp server. You can upload the aev7.php file to the root directory or to a specific folder on your site.
Watch this video to learn how to upload the script, test it and verify emails using the web script.
3. Does the Advanced Email Verifier only check the domain part of the email address? Can it check the bit before @ as well?
By default the Advanced Email Verifier checks the entire email address and not the domain for validity. But if you check the "Fast checking (DNS query only)" option under the Home menu, the program will verify the domain only.
4. I'm trying to validate emails using your program and have received several messages about being blacklisted. What is the best way to check emails but not put alarms up with the ISPs?
Note that the Advanced Email Verifier supports different connection modes (the way it connects to the recipient’s mail server to verify the email address).
Do not use the direct Internet connection mode if you installed the Advanced Email Verifier on a local computer. This mode can be used only if you install the program on a Windows VPS or Windows server with proper PTR and FCrDNS records. Otherwise, your IP can be blacklisted or you can get a lot of connection refusals (“Unknown” results) because most SMTP servers refuse direct connections from personal/home computers.
On a local computer you can only do a Fast checking (DNS query only), i.e check if the email domain exists. Or, use an alternate connection modes, for example BPSocks Email Validation API.
5. I have a DB that I am constantly adding emails too. Its on a mysql server. My question is, how do I check only the new emails that have been added. I don’t want to keep checking the same emails over again and having to use my bpsocks credits. I only want to check the new emails that I have added to the DB.
If you write a status or verification result to the database, you can then filter the emails in the database by that field. Select only the email addresses where the status or verification result is empty, for example, or has any value that tells that this is a new email address. When the filter is set, click on the “Start” button. The program will verify only the email addresses that satisfy the filter criteria.

6. I want to clean some large email lists (some up to several million large). Will Advanced Email Verifier do this for me? How long would it take to clean an email list of 10 million email addresses?
You can load up to one million emails into a list in the Advanced Email Verifier. So, you can split your huge list into smaller lists and upload them into the program.
Or, you can load millions emails into an external database, for example, MS SQL database, and create a link to the database from the Advanced Email Verifier. The AEV works well with large databases. The verification results will be written to the database. Or, you can check the option to save good and bad emails to separate files on the local disk.
If you have a fast connection to the Internet, you can set 500 threads to speed up the verification process. For example, we were able to verify 10 000 emails in an hour.
7. I did a test with non existing emails and I got 'Good' status. Why?
Note that the Advanced Email Verifier (just like any other email verifying program) can determine up to 70-90% of bad addresses. To verify an email address, the program connects to the recipient's mail server, and imitates sending a message. When the server gives a response that the appropriate email address is good or bad, the AEV disconnects from the server and marks the email address accordingly.
But 10-30% of email addresses cannot be checked without sending a real message to them. You will always get the emails from these domains (be they valid, invalid, or fake) flagged as Good because the appropriate SMTP server receives all the emails for all users. AEV that imitates sending a message "thinks" that the email address is valid, disconnects from the server and marks this email as OK. Thus, all the addresses from such domains can be verified only after sending a message to the user. If the message bounces, the email address is not valid.
The Advanced Email Verifier has the built-in Bounced Manager that you can use to process bounced emails and exclude those invalid email addresses which could not be found during the list verification. Here you can watch our video tutorial on how to handle bounced emails using the Advanced Email Verifier.
8. I checked 200 emails today so far on 2 different lists and I got over 70% “Unknown” as a response back and very few that are considered bad and the rest are considered good. I then sent out a message to all of those emails I validated except to the bad ones. Only 19 of 76 “Unknown” bounced. Why did most of my “Unknown” email addresses turn out to be OK?
What matters is the IP address you verify email addresses from and the IP address you send emails from.
When you verify the email addresses using the Advanced Email Verifier, the verification is done using your computer’s IP address. If your IP is dynamic and/or listed in some spam databases and/or does not have proper PTR and FRcDNS authentication records, the recipients’ mail servers will reject the connection from your IP. In this case the Advanced Email Verifier will not be able to determine if the email address is Bad or Good. In this case the Advanced Email Verifier marks the email address as Unknown with the errors like “550 ERROR: Mail Refused”, “553 Not delivered: Sender’s IP blacklisted by njabl.org.”, “554 combined.njabl.org blocked”, “554 Relaying denied. IP name lookup failed for xx.xxx.xxx.xx”, “550 Dynamic IPs/open relays blocked” in the LastResponse field.
But it’s not the same when you send the message to the recipients through the SMTP server. In this case the connection is done from the SMTP server’s IP address. If the server’s IP is clean and have all authentication records properly setup, the connection will be accepted and the message will be delivered. So, even if the Advanced Email Verifier marked the email address as “Unknown”, it may happen that the email address is actually good.
9. We don’t know what 'Grey Listed' means but those slow down the whole process along with the timed out emails.
The greylisting technology is used by some mail servers to prevent spam. It means that the mail server rejects the 1st connection to it. If the user re-tries the connection in 5-10 min, the connection is accepted. It is supposed that spammers never re-try to send the email.
So, when the Advanced Email Verifier hits an email address where the mail server uses the greylisting technology, it marks the email address as 'Greylisted'. Some time later the Advanced Email Verifier re-connects and checks the email address.
In the Advanced Email Verifier settings there is the “Recheck greylisted emails in one session” option. If you check it, the program will re-connect to check greylisted emails together with all other emails. In this case the verification process runs slower.
You can go to the Settings and uncheck the "Recheck greylisted emails in one session" option. In this case the Advanced Email Verifier will not re-connect to the mail server to check greylisted emails and the process will go faster. You will see ‘Greylisted’ emails among the results.
You can re-check ‘Greylisted’ emails later (Start –> Verify email addresses –> Greylisted). As from our experience about 80% greylisted emails turn to be good.
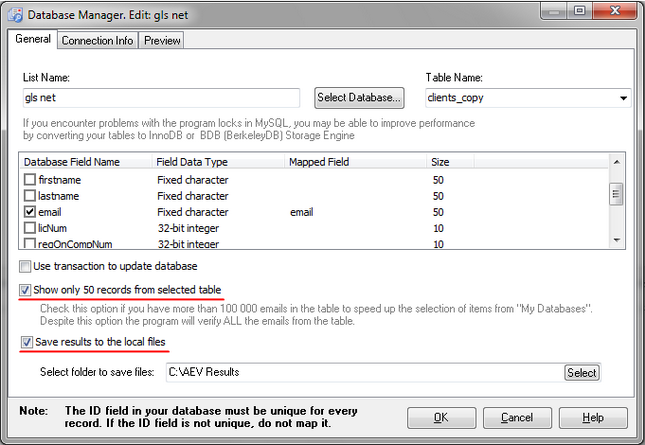
10. I run the software to verify emails from a MySQL database. I have more than 1 million records. The AEV often crashes when connecting to the database. When connected, it won't run through the entire database, it seems to randomly stop for no reason.
A MySQL database is not destined to handle millions emails. That's why you may encounter troubles with verifying emails from a MySQL database. To improve the program performance with a MySQL database, you can do this:
1. Convert your tables to InnoDB. See "The InnoDB Storage Engine"
2. Check the "Don't cache results of forward-only cursors" option under the Cusrors/Results tab on the MySQL Connector/ODBC screen when you create a user DSN for MySQL database.
3. Check the "Show only 50 records from selected table" in the Database Manager when you create a link to the MySQL database in the Advanced Email Verifier.
4. Check the "Save results to local files" option and write the results to the files on the local disk instead of the database.
11. I'm trying to connect to a local MySQL database on my Windows 64-bit machine, I've installed everything including the ODBC drivers, set up and tested ODBC OK, but I get an error connecting from Advanced Email Verifier: "Test connection failed because of an error in initializing provider. Data source name not found and no default driver specified".
Make sure that you installed MySQL Connector 32-bit, not 64-bit.
Re-download it and re-install MySQL Connector 32-bit.
Then do this: click Start -> Run and execute this command
C:\Windows\SysWOW64\odbcad32.exe
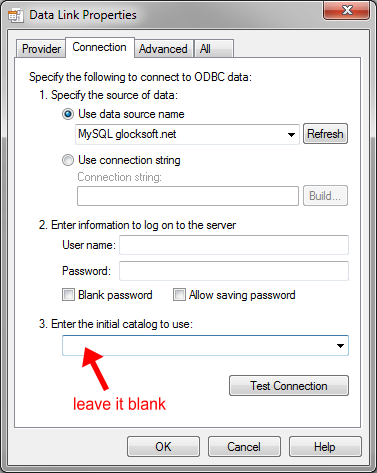
12. OK, I've removed x64, installed the x86 ODBC connector, I've added a new ODBC entry which tests OK but Advanced Email Verifier gets the error "Test connection failed because of an error in initializing provider. Catastrophic Failure".
Make sure that you left the "Enter the initial catalog to use" field on the Data Link Property screen empty.
13. I want to import 1,000 contacts into the list for verification. How can I import them in an easy way?
There are two ways to import emails into a list in the Advanced Email Verifier: 1) "Load List" option and 2) Import Wizard.
1) The "Load List" option allows load emails from .txt and .csv files. The file must contain only the email addresses without additional fields. The email addresses must be alined one per line:
address1@email.com
address2@email.com
address3@email.com
etc.
To load emails, do this:
1. Select the list in My Lists section
2. Click on the Home menu
3. Click on Load List
4. Select the file
5. Click Open
2) Import Wizard allows importing the emails from different file formats. Plus, if you have additional fields in your file such as First name, Last Name, Company Name, etc., Import Wizard allows you import these fields too.
To use the Import Wizard, select the list, click on the Home menu and then click on the Import Wizard button. Then follow the steps of the Import Wizard.
14. I'm trying to import a new list but I can't select the fields like first_name and last_name. Is there a way to import and export emails with additional fields?
To be able to import additional contact information such as first names, last names and other, you need to add the respective fields to the list first. To do this:
1. Put the cursor at My Lists at the left pane
2. Click on New -> Create New List
2. Click on the Insert button and type the field name, for example, First_Name.
3. Select the field type and click Insert again to add another field.
4. When all the desired fields are added, click Create.
Now your custom fields will be available in the Import Wizard.
To export good emails with additional fields to a file, use the Export Wizard.
15. When I import a file, it does not always import the entire file.
The program skips duplicate email addresses during the import.
16. Can the Advanced Email Verifier check the email address syntax?
Yes, it can. To check the syntax of email addresses, click on the down arrow under the tart button and click on “Verify Email Syntax Only”.
Scott Satterthwaite
| #
There needs to be a way to execute a verification from the command line, allowing the program to be run via Windows Scheduler. We have multiple databases that collect sales leads from various sources. The tables are constantly appended with fresh data. This means the new e-mail addresses must be verified several times per day. If it could be possible to create and save a “profile” that includes the database settings including the applied filters and then execute the program while passing the file name of the saved profile, the value of this software would be much greater.
Julia
| #
Hi Scott,
You can create a direct link from the Advanced Email Verifier to the database and verify emails without importing them into the program. You can update the database and the Advanced Email Verifier will always read an up-to-date list from your database. You can then verify only new emails from the database. You can see the question #10.
Carl M.
| #
Is there a way to use AEV, or is there another tool that will ONLY check the email address formatting against the RFC rules? Meaning, I would like to check the addresses for proper formatting, but NOT connect to any external SMTP servers to do so.
Julia
| #
Hi Carl,
Yes, you can check the email addresses for proper formatting only. Go to the Advanced Email Verifier -> Settings -> General and look at the “Check Email Syntax” section where you can choose the option to check the email syntax against the RFC rules. Then check the “Fast checking (DNS) query” only option on the Advanced Email Verifier menu bar. Now start the verification.