How to Process Bounce Emails with the G-Lock Email Verifier
In the version 8 of the Advanced Email Verifier we added the Bounced Manager. Now you can use the Advanced Email Verifier to process those bad email addresses that could not be determined by the program during email verification and ensure that your list is 100% clean.
The Bounced Manager recognizes all types of bounce emails: hard bounce, soft bounce, mail block and abuse/fraud feedback reports. Plus, the Bounced Manager can determine transient bounce, challenge-response and auto-reply messages and delete them from the mail server.
Tip Use the Bounced Manager AFTER you verified your list, deleted bad email addresses from the list and sent the message to other email addresses that were classified as Unknown, Timeout or Greylisted. If some of these emails turn to be invalid, the message will bounce. Using the Bounced Manager you can save bounce email addresses to a file and then remove them from your list forever.
Follow the steps below to setup the Bounced Manager and handle bounce emails.
Step 1. Configuring Email Server Account.
Within the Advanced Email Verifier you create one or more accounts to process bounced emails from. An account defines where the program will read and retrieve messages from.
To create an account:
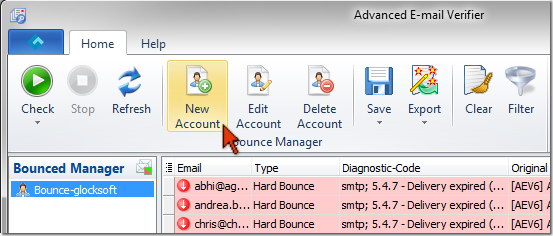
Click on Bounced Manager at the left pane.
Click on New Account under the Home menu on the toolbar.
Type an account name. For example, you can use the email address you will process the emails from as the account name.
Select the account type: IMAP, POP3 or File System.
Enter the incoming mail server settings.
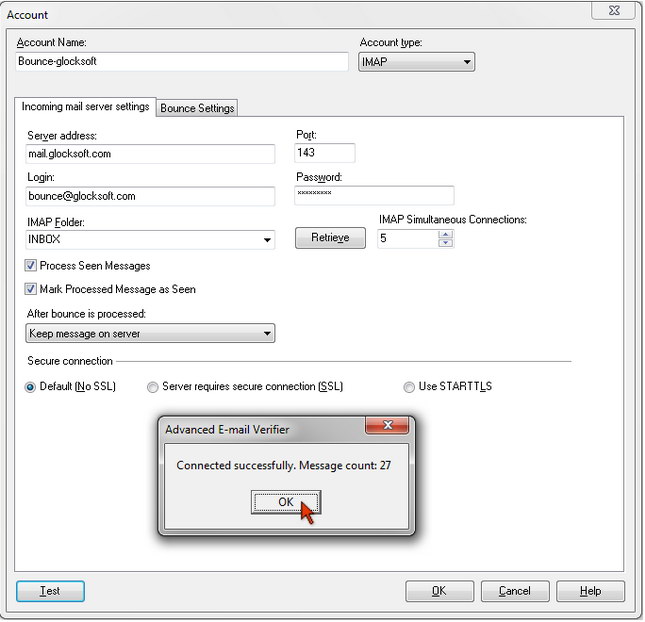
IMAP Server Settings
If your mail server supports both POP3 and IMAP protocols, it's recommended that you use the IMAP protocol. The speed of processing bounced emails from an IMAP account can be up to 7 times higher than from a POP3 account (the speed of email processing depends mostly on the quality of Internet connection, message size and other factors).
Server address: type your IMAP server name into this field.
If you are not sure you type the correct IMAP server name, check the account settings of your regular email client for the servers information. If you are not able to find the servers information within your email client, contact your ISP directly.
Port – 143
Login – your login name for the IMAP server.
Password – your password for the IMAP server.
IMAP Folder – click Retrieve to retrieve IMAP folders from the mail server and select the folder you want to process bounced emails from. If you do not select any folder, the program will process bounced emails from the Inbox.
IMAP Simultaneous Connections – set the number of simultaneous connections to your IMAP account. For example, Google allows maximum 10 simultaneous connections. If you use your regular email client to check your Google account, set 9 connections in the Advanced Email Verifier.
Process Seen Messages – check this option if you want to process seen messages too.
Mark Processed Message as Seen – check this option of you want to mark the messages as seen after they are processed.
After bounce is processed: – select the action what to do with processed bounced emails from the menu: Keep message on server, Delete message from server, or Move message to folder.
If you select "Move message to folder" action, then select the IMAP folder to move the message to.
If your mail server doesn't require secure connection, check the Default (No SSL) radio button.
If your server uses a security protocol, check the radio button: SSL or STARTTLS.
STARTTLS is the ESMTP keyword used to initiate a secure connection between two servers using the Secure Sockets Layer (SSL) (also known as TLS). Once the connection has been successfully established all further communication between two servers is encrypted. This means that the source and destination email address and the entire message content are all encrypted during the transfer.
Click Test to see if the account settings are correct.
POP3 Server Settings
Server address – type your POP3 server name into this field.
If you are not sure you type the correct POP3 server name, check the account settings of your regular email client for the servers information. If you are not able to find the servers information within your email client, you can contact your ISP directly.
Port – 110
Login – your login name for the POP3 server.
Password – your password for the POP3 server.
After bounce is processed: – select the action what to do with processed emails from the menu: Keep message on server, or Delete message from server.
If the server doesn't require secure connection, check the Default (No SSL) radio button.
If the server uses a security protocol, check the radio button: SSL or STARTTLS.
STARTTLS is the ESMTP keyword used to initiate a secure connection between two servers using the Secure Sockets Layer (SSL) (also known as TLS). Once the connection has been successfully established all further communication between two servers is encrypted. This means that the source and destination email address and the entire message content are all encrypted during the transfer.
Click Test to see if the account settings are correct.
File System
Select File System from the Account Type menu if you want to process bounced emails stored in a local or network folder.
Select the folder on the disk to process bounced emails from.
After bounce is processed: – select the action what to do with processed emails from the menu: Keep message in folder, Delete message from folder, or Move message to folder.
If you select "Move message to folder" action, then select a destination folder on the local or network disk to move processed bounced messages to.
Click Test to see if the account settings are correct.
After you entered your Incoming Mail Server settings, click on "Bounce Settings" tab.
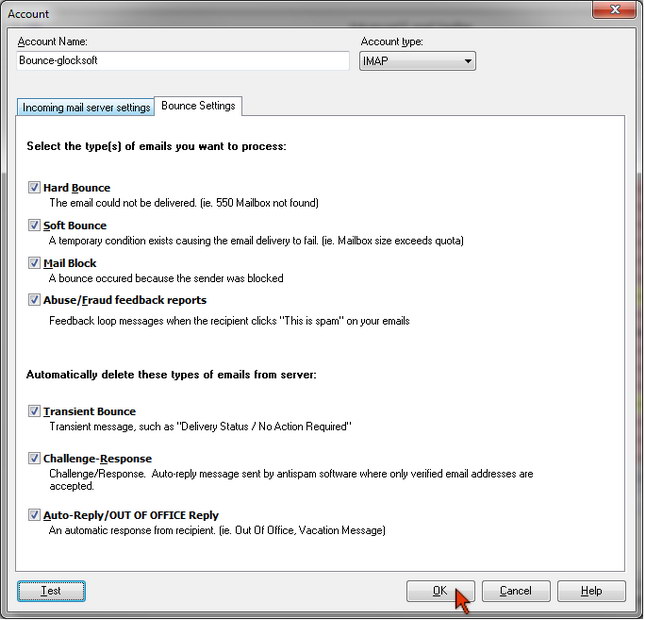
Bounce Settings
Select the type(s) of bounce messages you want to process:
- Hard Bounce: the email could not be delivered (ie. 550 Mailbox not found).
- Soft Bounce: a temporary condition exists causing the email delivery to fail (ie. Mailbox size exceeds quota, host not found).
- Mail Block: a bounce occurred because the sender was blocked.
- Abuse/Fraud feedback reports: feedback loop messages sent when the recipient clicks "This is spam" button on your emails.
In addition, you can select the following types of emails for automatic deletion from the mail server:
- Transient Bounce: transient message such as "Delivery Status/No Action Required".
- Challenge-Response: auto-reply message sent by antispam software where only verified email addresses are accepted.
- Auto-Reply/Out of Office Reply: an automatic response from the recipient (ie. Out Of Office, Vacation Message).
To save the Account settings, click OK.
Step 2. Processing Bounced Emails.
To start processing bounced emails:
Click an arrow in the Check button under the Home menu.
Select the Account name.
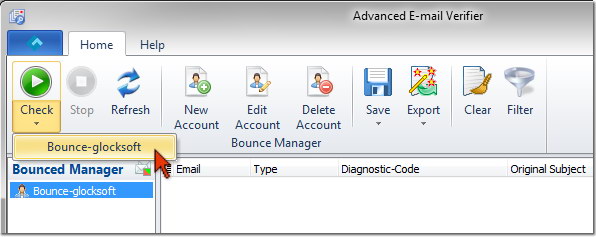
If you added more than one account, you can click the "Check" button and the program will check all accounts at the same time.
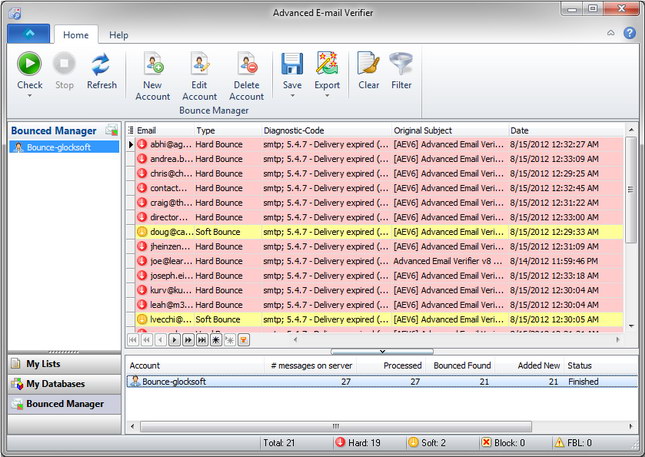
The results screen will show the following information about bounced emails:
Email – email address which bounced
Type – bounced email type
Diagnostic-Code – error code
Original Subject – subject of the original email sent to the recipient
Date – date when the message bounced
The bottom panel in the Bounced Manager gives you the following information:
Account – email account name
# messages on server – the number of email messages (bounce and not bounce) in the mailbox
Processed – number of processed emails
Bounced Found – number of bounced emails found on the server
Added New – number of new bounce emails found since the last account check
Status – account status
Step 3. Saving Bounced Emails to a File.
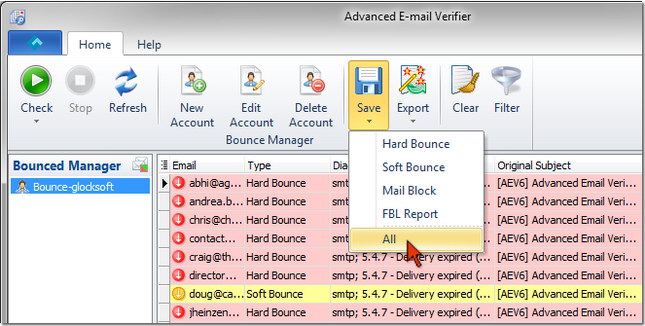
To save bounced emails to a file:
Click Save under the Home menu.
Select Hard Bounce, Soft Bounce, Mail Block, FBL Report or All from the menu.
Type a file name.
Click Save.
The program will save only email addresses to a file.
To export bounced emails to a file:
Click Export under the Home menu.
Follow the steps of the export wizard.
The Export Wizard allows exporting the data the files of the following formats: Paradox, DBase, Text (.CSV), HTML, Excel, Word, SYLK, DIF, Lotus 1-2-3, QuattroPro, SQL script, XML, MS Access, MS Windows Clipboard, and ADO Connection.
During the export you will be able to select the columns you want to export to a file.
The program does not clear bounced emails from the screen automatically. Click on Clear button on the Bounced Manager toolbar to delete bounced emails from the screen.