How to Process Bounce Emails with G-Lock EasyMail7
The bounce ratio is the number of undelivered emails versus emails you sent. Keep an eye on bounces generated by nonexistent addresses. The ratio shouldn’t exceed 5%. If higher, your newsletters may get blocked by providers such as Yahoo! and Gmail and never reach the inbox.
Just remember – a fully confirmed opted-in list is important. It is a general prerequisite for sustainable email deliverability, your sender reputation, and conversion rates.
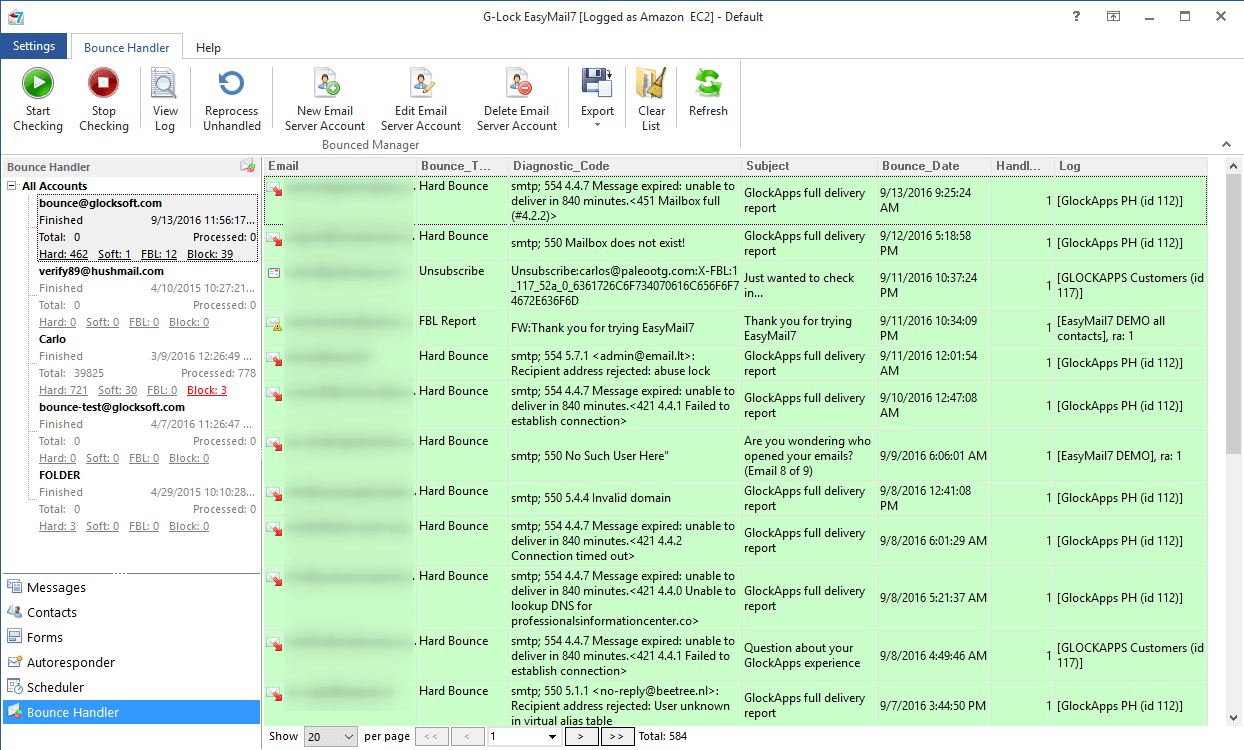
Using the Bounce Handler in G-Lock EasyMail7 you can process bounced emails after your email campaigns automatically. The program determines hard bounce, soft bounce, mail block and abuse/fraud feedback reports bounce emails. The Bounce Handler can automatically unsubscribe or delete bounce emails from internal groups, update external databases, insert and delete bounce emails from external databases.
Plus, it can delete transient bounce, challenge-response and auto-reply messages from the server.
Follow the steps below to configure the Bounce Handler and start processing bounce emails.
Step 1. Creating Bounce Email Server Account.
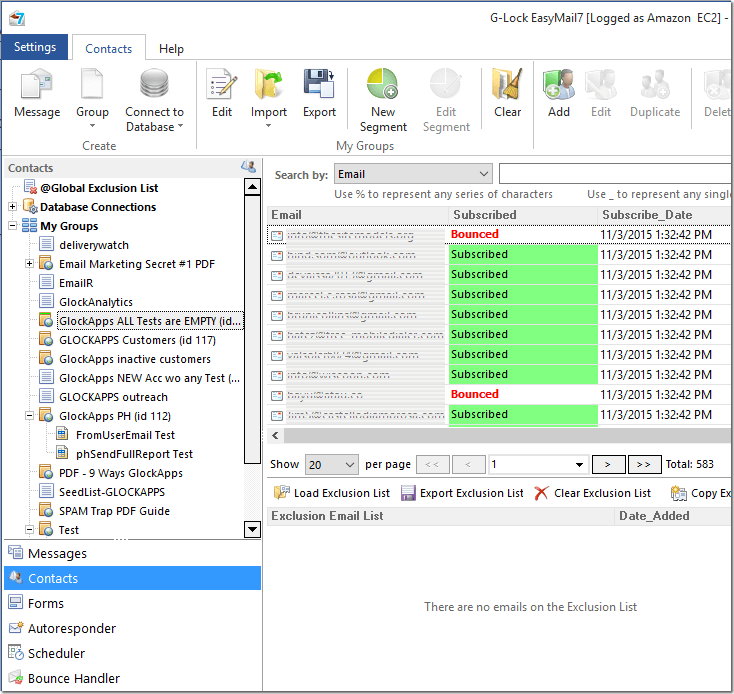
Click on the “Add to Bounce Handler” button.
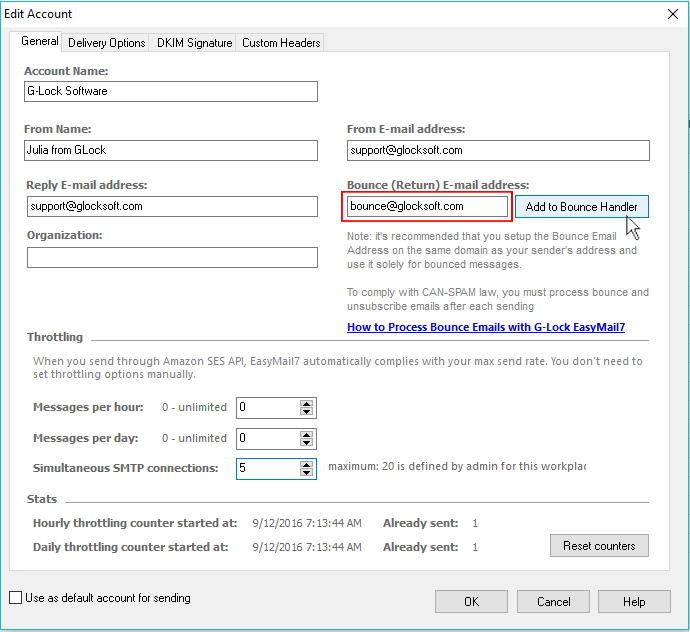
The program will open the account settings in the Bounce Handler and prefill the Login field with your bounce (return) email address.
Check the "Check account automatically each hour" option if you want to automate bounced emails processing.
Select the account type: IMAP, POP3 or File System.
Enter the incoming mail server settings: IMAP Server Settings, POP3 Server Settings or File System.
Below are POP3/IMAP settings of some ISPs
1and1
Account Type: IMAP
Server: imap.1and1.com (or imap.1and1.fr)
Port: 143
Secure Method: none
Login: your email address
Password: your password
GMail
Account Type: IMAP
Server: imap.gmail.com (if it does not work, you should try imap.googlemail.com)
Port: 993
Secure Method: SSL
Login: your GMail email address
Password: your GMail password
If you have a connection issue with GMail whereas you’re absolutely 100% sure about your username and password, thy this:
– make sure you enabled the IMAP connection on your GMail account;
– try to unlock your GMail account because sometimes GMail blocks the application;
– enable the option “Allow less secured applications” in the Gmail account’s parameters, section “Connection and security”.
GoDaddy
Account Type: POP3
Server: pop.secureserver.net
Port: 110
Secure Method: none
Login: your email address
Password: your password
OVH
Account Type: POP3
Server: ns0.ovh.net
Port: 110
Secure Method: none
Login: your email address
Password: your password
Office365
Account Type: POP3
Server: outlook.office365.com
Port: 995
Secure Method: SSL
Login: your email address
Password: your password
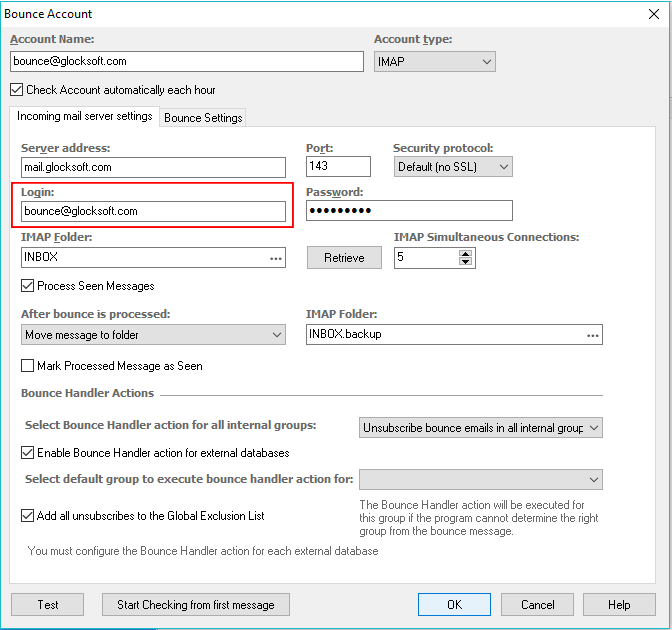
Select the action what to do with bounce messages after they are processed:
– Keep message on server
– Delete message from server
– Move message to folder (for IMAP and File System only).
Select secure connection type: Default (No SSL), SSL or STARTTLS.
Bounce Handler Actions
In this section select what you want to do with bounce emails in internal groups and external databases.
For internal groups (My Groups in the address book) it is enough to select the Bounce Handler action here:
None – the program will only retrieve bounce emails from your mail server and do nothing with them in groups.
Unsubscribe bounce emails in all internal groups – the Bounce Handler will change the status of the contact to “Bounced”.
Delete bounce emails from all internal groups – the Bounce Handler will delete bounce emails from all internal groups.
The unsubscribe and delete actions apply to ALL internal groups at a time though you might have sent the message to one or few groups only. The Bounce Handler will mark as bounce or delete the bounce email from ALL groups where it exists.
For external databases (My Databases), check the "Enable Bounce Handler Action for each external database" option and then you will need to configure the update or delete action for each database separately when you create or edit a link to the database.
Select default group to execute bounce handler action for – here you can select an external group to which you want to apply the bounce handler action if the program cannot find the group the message was sent to in the message header.
Add all unsubscribes to the Global Exclusion List – check this option if you want the program to add all email addresses that unsubscribed to the Global Exclusion List.
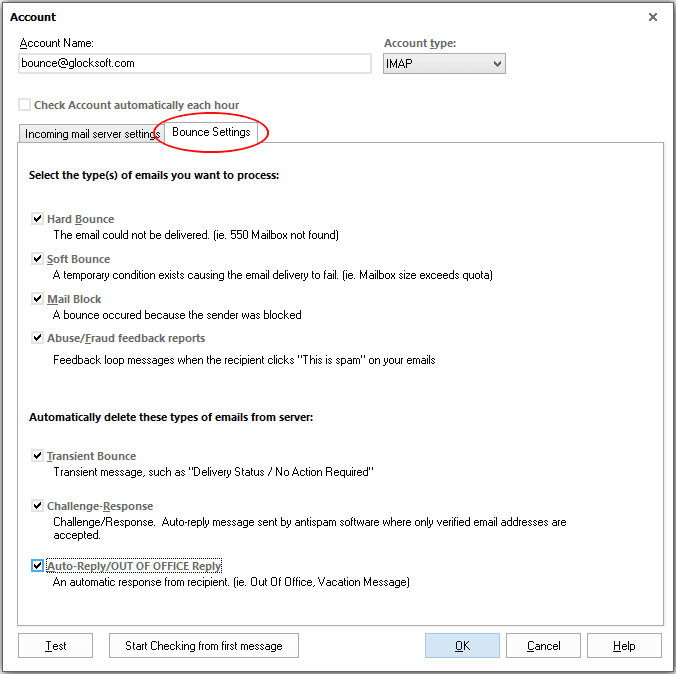
Bounce Settings
Click on the Bounce Settings tab in the account to choose the types of bounce messages you want the program to recognize.
Click "Test" button to test your account settings. If the test passes, click OK.
If you want to unsubscribe or delete bounce emails from internal groups only, now click on the "Start Checking" button on the menu bar. The Bounce Handler will retrieve bounce emails from your mail server and automatically mark as bounce or delete bounce emails (except soft bounce) from all internal groups.
When you send a new message to internal groups, the program will automatically filter ounce and unsubscribed emails and exclude them from the mailing campaign.
If you operate external databases and want to unsubscribe or delete bounce emails in external databases, go to the step 2.
Step 2. Configuring Bounce Handler Actions for External Groups.
Update Database with Bounce Emails
Go to "Contacts", select the database link and click "Edit" on the menu bar.
Click on the Bounce Handler Action tab in the database manager.
Select the action: Update.
Map the fields to update the database. Select the field name in the Bounce Handler Field column. You can update the database using all the extracted fields.
The Bounce Handler extracts these fields from a bounce email:
Bounce_Email – bounce email address
Bounce_Type – bounced email type
Diagnostic_Code – error code
Original_Message_Subject – subject of the original email sent to the recipient
Bounce_Date – date when the message bounced
In addition, you can enter a custom value to update the database. For example, if the Status field in your database contains the subscription status, you can type 'unsubscribed', or 0 or any other value for this field that will be inserted into the database for bounce email addresses.
If you set a string value like unsubscribed, put it in quotes: 'unsubscribed'.
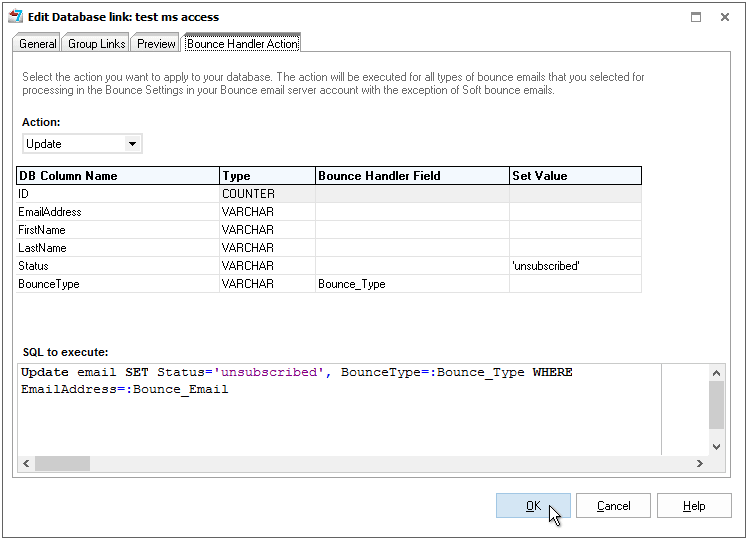
Click OK.
Delete Bounce Emails from the Database
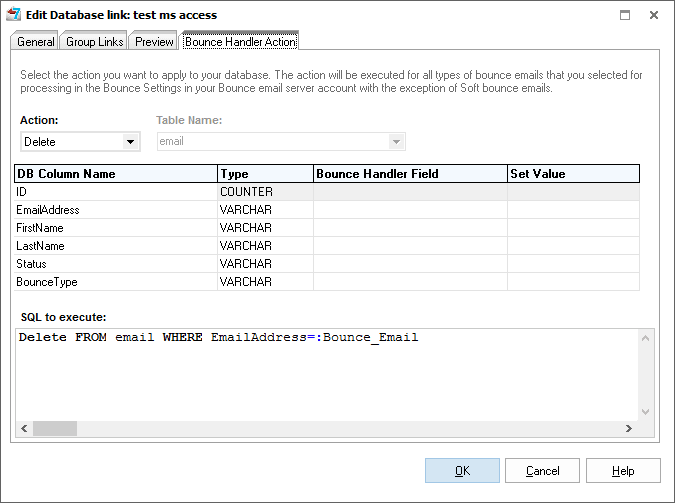
Click on the Bounce Handler Action tab in the database manager.
Select the action: Delete.
Click OK.
Insert Bounce Emails into the Database
In addition to the update and delete actions, the program can insert any of the fields extracted from bounce emails and your custom values into a different table in the database.
Click on the Bounce Handler Action tab in the database manager.
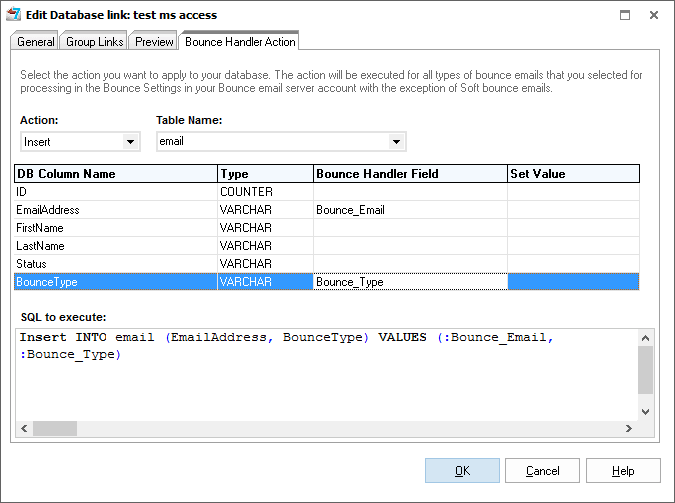
Select the action: Insert.
Select the table from the database.
Map the fields to insert them into the table. Select the field name in the Bounce Handler Field column.
You can insert all extracted fields.
In addition you can enter a custom value in the "Set Value" column to insert it into the database.
If you set a string value like unsubscribed, put it in quotes: 'unsubscribed'.
Step 3. Testing the Whole Bounce Handling Process.
Before using the Bounce Handler in the production mode, you should test each step to make sure it’s working as it should and identify and fix the problem if there is one.
The testing process is simple:
1 In EasyMail7, create a test group with one or several non-existing email addresses.
2 Send a test message to the test group.
You should receive a bounce message on your bounce mailbox. Once you see that bounce message in your bounce mailbox, the EasyMail7’s Bounce Handler will be able to handle it.
3 Go to the Bounce Handler and click on the "Start Checking" button.
The Bounce Handler must read this bounce message in your mailbox and apply an action on your subscriber (mark him as Bounced or delete him). If the action was successfully applied, the bounce message in the Bounce Handler is highlighted by the green color.
4 Go to the Contacts and check whether or not the subscriber in the group has changed the status or has been deleted.Step 4. Process Bounce Emails.
After you make sure that the whole bounce handling process is working correctly, you can let the Bounce Handler process your bounce emails.
When the process is finished, go to "Contacts", click on the database link and check if the database was updated or not. If you send emails via a delivery service, you may need to make a few more steps to make your delivery service forward your bounces to your bounce email account. SendGrid There is an option in SendGrid to redirect the bounce message to another email address so the EasyMail7’s Bounce Handler can process your bounce messages. Connect to your SendGrid account, go to Email Reports -> Settings -> Forward bounces. Check the box and enter the forwarding email address which should be your EasyMail7’s return address. ElasticEmail You can specify a forward email address on your ElasticEmail account under the tab “Setup” so bounce messages are redirected to your EasyMail7’s return email address. Amazon SES Amazon SES will automatically forward your bounce emails at your EasyMail7′ return address. No specific setting is required. SparkPost SparkPost will handle your bounce messages internally. It does not support the forward of bounce emails so you will not be able to process them with the EasyMail7’s Bounce Handler.