Send Posts Digest
In addition to regular email newsletters, WPNewsman allows you quickly send a blog posts digest to your subscribers. You can insert posts excerpts into any template or new message.
Insert Posts into the Email
Go to Mailbox under WPNewsman.
Click on “New Message”.
Select “From Template” or “Quick Message”.
Put the mouse in the message body where the fist post excerpt must start.
Click on the “Insert Posts” button in the editor.
If you installed a template from the WPNewsman’s template store, you don’t need to put the mouse in the message body to tell the plugin where to insert the posts. Just open the template in the edit mode and click on the “Insert Posts” button. The plugin itself will insert the posts into the right place.

Wait until the posts are loaded and click on the posts you want to insert into the message.
With one mouse click you can select the posts for the last day, week or month.
You can select the post type, category, author, and content.
“Full post” includes the entire posts into the message.
“Excerpt” includes your own excerpt you wrote when publishing the post.
“Fancy excerpt” includes an automatically generated excerpt (50 first words by default).
Click OK to insert selected posts into the message.

Customize Posts
You can customize inserted posts as you want now. You can change the text font and size, you can edit the port title and excerpt.
You can delete the image if you don’t want to send it together with the post excerpt.
To delete the image, click the right mouse button on the image and select Cell -> Delete Cells.
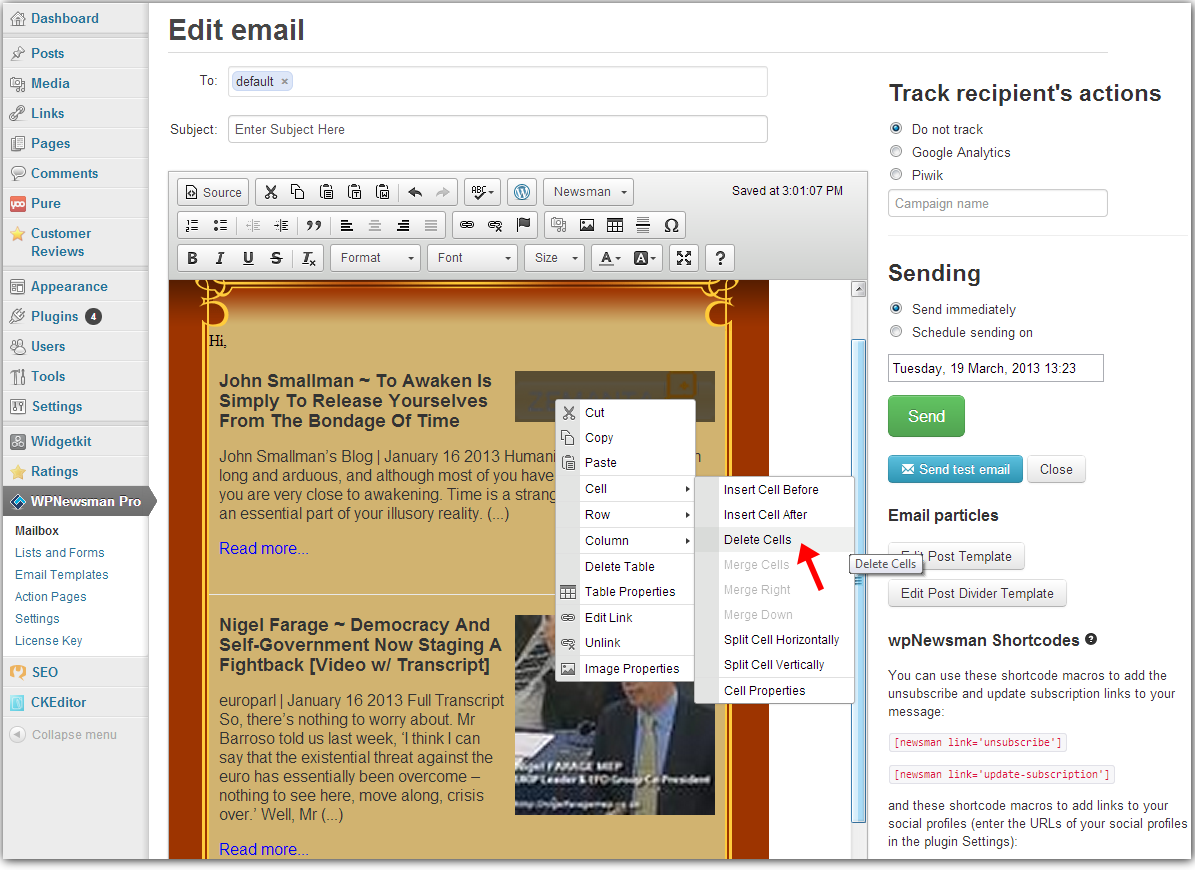
Click on the image to enlarge it
Edit Post Template
Click on “Edit post template” at the right side.
Make the changes to the template layout.
To create blog posts container, you must set the required attribute gsspecial=”posts”. This attribute can be used on any html element that can have child nodes. This means you can use it right on the <td> element without the need to create additional level of nesting by using the <div gsspecial=”posts”> inside that <td>.
Example:
<td gsspecial="posts">
</td>
When you add posts to the template, the editor looks for a special file (particles file) that has the same name as the template file but with the “_” symbol in front of it. For example, if the main template filename is digest.html, the particles file name will be _digest.html. This file MUST exist in the directory of the template in order for the digest functionality to work.
This file contains two required editable block elements <div gsedit=”post_block”> and <div gsedit=”post_divider”>.
You don’t need to maintain valid html markup around these blocks, it won’t be considered anyway. You can just place these two block as the top level of html elements.
Trimmed example of particles file content:
----- begining of the particles file -----

<div gsedit="post_block">
<h2>[gsom post='post_title']</h2>
<p>[gsom post='fancy_excerpt' words='150']</p>
</div>

<div gsedit="post_divider">
<hr width="520" height="1"/>
</div>

----- end of particles file -----
For each selected post, the editor takes the post_block block element, fills all the short codes and appends the post_divider block element. The post divider block will not be appended after the last post.
To save the changes to the template layout, click on the “Save” icon.
Edit Post Divider
Click on “Edit Post Divider Template” at the right side.
Edit the divider.
Click on the “Save” icon.
Send Posts Digest
It’s highly recommended that you send a test message to yourself before sending it to the list.
Click on “Send Test Email” button, type your email address and click “Send”.
If the test message display correctly in your Inbox, you can send it to the entire list.
Choose the list name in the To field and type the message Subject.
Choose the sending option: Send immediately or Schedule sending.
Click “Send”.
To save the message as a draft and send it at a later time, click “Close”.