Bounced Email Handling
WPNewsman Pro version has the built-in Bounce Handler that you can use to process bounced messages and delete auto-reply emails after each mailing. Bounced emails can be a real problem if not handled in a timely manner. Continuous sending to invalid users leads to your IP address being blacklisted by your ISP and hurts your sender reputation.
With that in mind, we implemented the Bounced Handler module in the WPNewsman to help you send your newsletters to large mailing lists while keeping them verified and cleaned from bad (hard bounced) email addresses.
How Automated Bounce Handling Works
Bounced emails are sent to a dedicated bounce email address, like [email protected].
WPNewsman checks that email address periodically (every hour) and classifies bounced emails to "soft" and "hard".
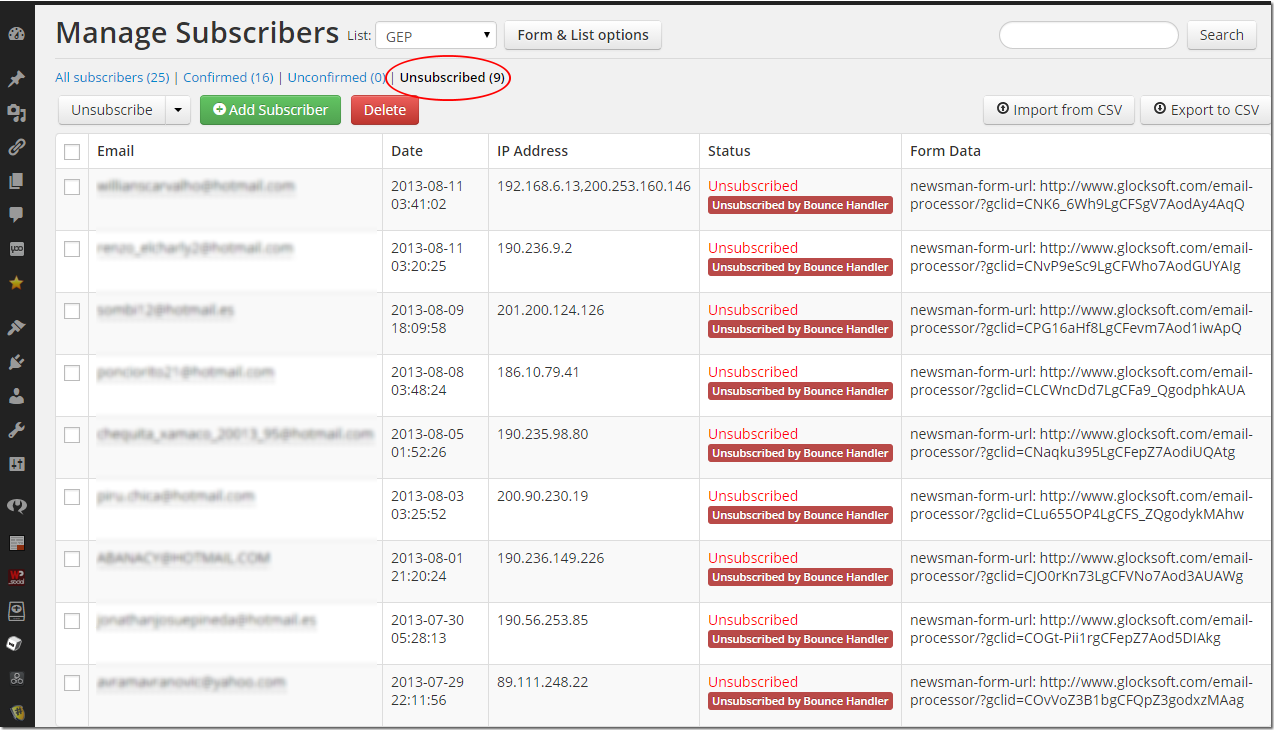
WPNewsman automatically unsubscribes "hard bounced" email addresses from your list. The plugin changes the status of "hard bounced" email addresses to "Unsubscribed".
If you check the "Remove bounced messages from the server" option, the plugin deletes "hard bounced" emails from the server.
"Soft bounced" and unknown emails are left on the server. We recommend that you monitor your bounced email account from to time and delete unwanted emails from it.
Requirements for Bounce Email Address
1. It has to be on the same domain as your sender’s address. If you’re sending from [email protected], then your bounce email address should be [email protected].
2. It must be dedicated solely to bounced messages, nothing else.
If you send from a Gmail email address, you have to handle bounced emails from the same Gmail account. Otherwise, spam filters will be suspicious. If you send from any other email address, don’t use Gmail to handle your bounced messages.
We recommend that you create a dedicated Gmail account just for sending with WPNewsman and do not send from your personal Gmail account. Gmail has a limit of 500 emails per day and you may not be able to send your own emails on the same day you’re sending newsletters with WPNewsman!
Configuring WPNewsman to Handle Bounced Emails
Click on Settings under WPNewsman in your admin panel.
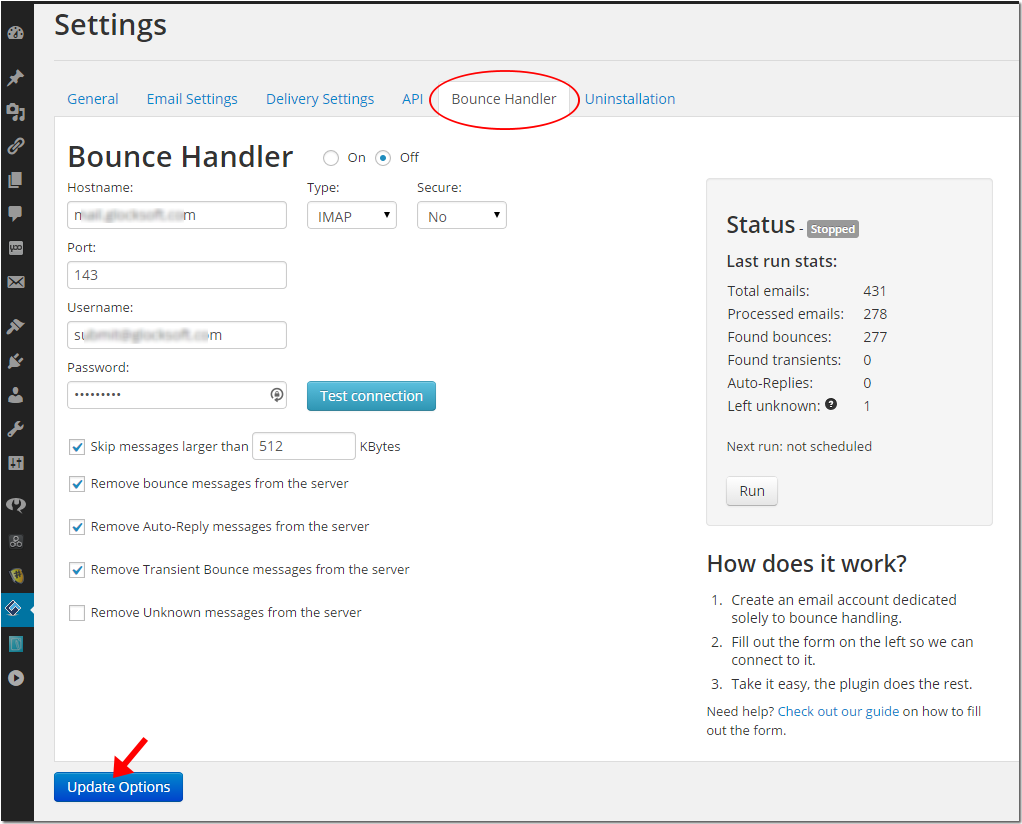
Click on "Bounce Handler" tab.
Enter your Incoming Mail Server settings:
Hostname: – your POP3 or IMAP server name. For example, if your Return Email Address is [email protected], enter the incoming mail server from mydomain.com. It may read like mail.mydomain.com or pop.mydomain.com or imap.mydomain.com.
Type: – account type (POP3/IMAP).
Secure: – if your server requires a secure connection choose SSL or StartTLS.
Port: – 110 for the POP3 account, 143 for the IMAP account (if you use the secure connection the port numbers will be different).
Username: – use your “Return Email Address” from the Email Settings as your username.
Password: – your password on the incoming mail server.
Skip messages larger than xx KBytes – check this option if you want the plugin to skip messages with a big size, for example.
Remove bounce messages from the server – check this option if you want the plugin to delete bounced emails from the server after they are processed.
Remove Auto-Reply messages from the server – check this option if you want the plugin to automatically delete auto-replies from the server.
Remove Unknown messages from the server – check this option if you want the plugin to automatically delete messages that were not determined as bounced or auto-reply from the server. It’s recommended to check this option if you do not monitor your account for bounce emails and do not want unknown messages to be accumulated in that mailbox.
Check "On" to enable the automatic bounce email processing. WPNewsman will check your account for bounced emails every hour in the automatic mode.
Check "Off" to disable the automatic bounce email processing and enable the manual bounced processing mode. In this mode you can click "Run"at the right side at any time when you want to process bounced emails.
Click "Update Options" to save the settings.
Click on the image to enlarge it
WPNewsman does not delete bounced email addresses from your list. It only changes the subscriber status to "Unsubscribed by Bounce Handler".
Click on the image to enlarge it
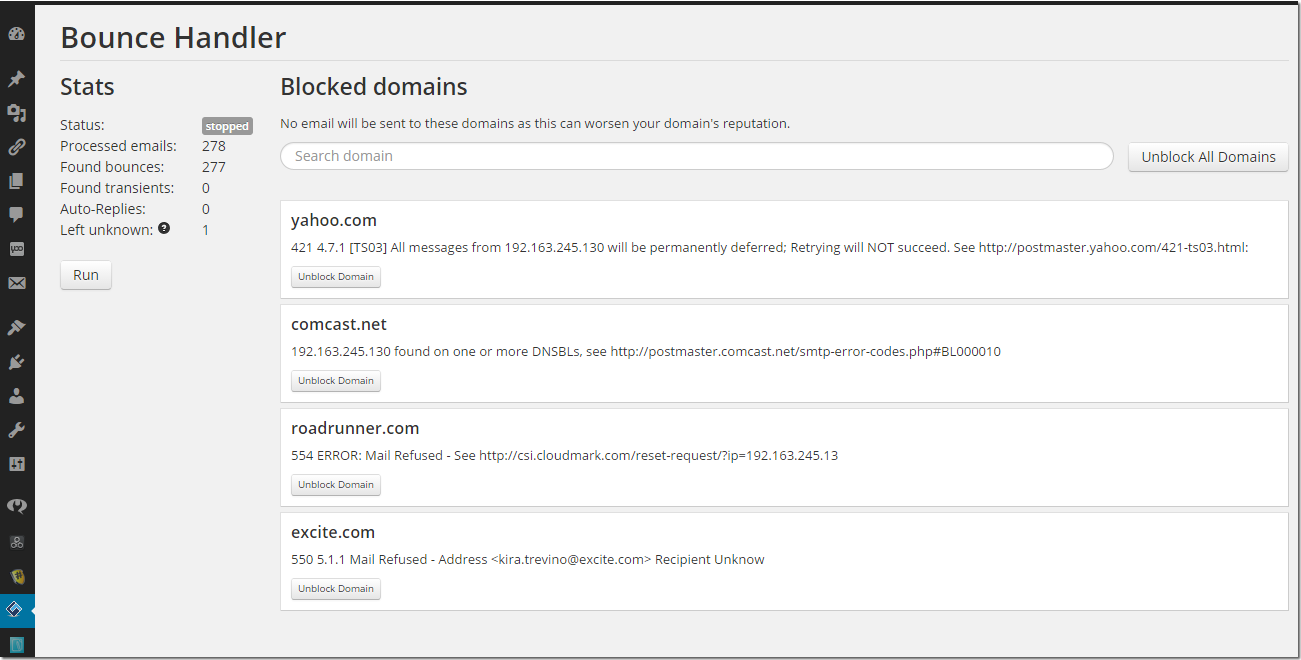
Why Bounce Handler Blocks Some Domains
In addition to “hard bounce” emails, the Bounce Handler monitors bounce emails of the “Mail Block” type and adds the email domains of such addresses to the Blocked Domains list.
You can see the Blocked Domains list in WPNewsman -> Bounce Handler menu.
Click on the image to enlarge it
“Mail Block” bounce emails occur if the message could not be delivered to the recipient because the recipient’s mail server is blocking email from you for any of the following reasons:
– it sees a high volume of emails from you, which is a characteristic of unsolicited, bulk emailing;
– it sees that the email from you has been sent in patterns which are characteristic of spam;
– your sending IP address is listed on some blacklists (lists of IP addresses which have been detected as sending spam and also contain dynamically assigned IP addresses which are not supposed to send email directly to mail servers, for example Cloudmark Sender Intelligence, the Spamhaus Zen, Return Path Reputation Network Blocklist and others);
After the Bounce Handler adds the domains of the “Mail Block” email addresses to the Blocked Domains list, all email addresses from these domains are automatically excluded from future mailings.
We don’t recommend unblocking domains until you fix the issue causing your emails being blocked. The steps you should take are:
1. Follow the URL in the error description under the domain to learn why your message was blocked by a certain ISP.
2. Take the measures suggested by the ISP to restore your good sender reputation.
3. Clean up your email list and delete invalid email addresses from it.
4. Check your subscription practices and lists to ensure that you send only to users who’ve requested it.
After you fix the issue(s), click on the “Unblock domain” button to unblock a certain domain, or click on the “Unblock All Domains” button to unblock all domains at a time.